On Catching the Sunset

If you’ve read Ann Voskamp’s One Thousand Gifts, you know that the climax of the book is her dashing off from dinner and dishes to run through a field and take a picture of the moon. It’s a glorious moment, and every member of my family who has read it told me that the scene reminded them of me.

I spent the Fourth of July in Nebraska, and if there’s one thing Nebraska does better than anywhere else, it’s sunsets. Something about how all the dust in the air reflects the light.

I wrote this and realized it how similar it was to Voskamp’s moment when I was typing it up:


“This is a silver bullet,” she said as I ran to catch the sunset.

The sky was glorious in pink and orange and I wasn’t wearing shoes as my feet sprung from the pavement, legs feeling long.

I thought vaguely of werewolves and The Lone Ranger and wondered if they were playing make-believe. But I could see the tips of clouds like gold and like brighter than gold and I don’t know if there’s a word for that.

One more building, and I would see it. The road ended, and then there was gravel and my feet felt the little stabs from it. But I could almost see gold and something brighter than gold.

A burr caught in my foot, and I was still thinking of the Lone Ranger and silver bullets. My lungs hurt.

And then I was there. And it was ecstasy. And I wished I could stay and see exactly how all the colors turn to gold and brighter than gold.

I snapped a picture that would never catch the frame, the exuberance, the brilliance.

I walked back past the girls on the sidewalk, the bottoms of my feet stinging from burrs and gravel.

They were arranging fireworks.


my Nebraska sunset

My Nebraska sunset

To Chicago with Love from Denver

“And if Denver is home,” the pilot says, “then welcome home.”

I’ve always been proud of being a Chicagoan—we have a very in-your-face way of saying our a’s, and we won’t think twice before cutting you off in conversation or on the highway, but we manage to be just a little less full of ourselves and a little less annoying than New Yorkers. Also, our city is clean and the lake is beautiful.

But while I’m proud to be from Chicago, I also recognize how little I know about the place and how loose my grip on the title Chicagoan is. You see, I grew up an hour from the city, not even in the same county (it is forty-five minutes by car not in rush hour and an hour by train if you took the Metra. And you should always take the Metra).

I grew up taking the train downtown to Ogilvie every year to go to the Lyric Opera, the Chicago Symphony, the Chicago Shakespeare Theater, The Art Institute of Chicago, the Field Museum, The Shedd Aquarium, the Adler Planetarium, and numerous other museums. We always went to Navy Pier and sometimes to Buckingham Fountain, and we would skate under The Bean and look at the Christmas story along Marshall Fields’ windows in winter. But I realized that I didn’t know where Hyde Park was and that I hadn’t been to Lincoln Park Zoo in ages and that there was so much more to the city than the Navy Pier Ferris wheel and Millennium Park.

But I had time. I was going to end up in Chicago. I knew it. That’s why I chose a faraway Georgia school for college—to have some years away from Chicago before I moved back. That’s one of the reasons we picked the University of Illinois for law school—so that we were close to Chicago and would most likely get a job there. My husband even spent two summers in the city for internships, and we turned several evenings into dates, wandering around Grant Park and the Loop.

And I still had time. I was, at the time, only three hours from the city. And we were going to move downtown someday, or at least into one of the suburbs, and I would have time to discover just why I was so proud to belong to Chicago and what other things there were to love about it as we went.

So you can imagine my surprise when we moved to Colorado. I have nothing against Colorado, except that it isn’t green and its mountains are too, well, rocky. And that it doesn’t have the Chicago Shakespeare Theater, the Lyric, Oak Street Beach, or—

Or, I guess, the fact that it isn’t Chicago and that I have never loved a city the way I love Chicago—not even Oxford, which is saying something—and that I am having trouble getting over the grief of not getting to know it like I always planned I would.

Not that I can’t visit or anything. I just have to be more intentional.

But that’s what brought this on:


We could have been close,
You and me.
I always thought we would be.
I would have loved your sharp turns
and bridges
And you would have taught me how
to love humanity while also seeing it.
I miss how I saw myself in the glass
and silver reflections, and I miss how
we would have grown together,
revealing secrets to each other the
way the river hides and finds itself as
it slips around the buildings.
Perhaps it would have been a bad
relationship, and I would have
resented your loudness and the way you
bare everything old and new and
wrecked.
Perhaps there wouldn’t have been
room for me, and you would have
suffocated me the way you’ve
suffocated the sky and stars that
spill out over the lake.
But I think I would have learned that
while you may knock me over with a
brush of your broad shoulders,
You also always have arms open to
enfold more,
Including the traveler and the
homesick
Me

On Moving Inland: This Blog Is Taking a New Direction, and So Am I

There are no streets to walk on, no maps you can rely on;
Faith and guts to guide you, wander ‘til you find you;
Only raw desire, no match to give you fire,
You’ll have to trust your heart
 
They don’t believe in oceans, you, you were a sailor
Who burned your ships and walked on, far away you walked on.
You keep turning inland where no man is an island.
It’s where you’re supposed to be.
 
You keep walking inland where no man is an island—
Come on home to me.
 
Afraid of your convictions, they said the land would change you;
Steady your confessions, your course make no corrections
When you are a stranger, hold your tongue and wager
Love will set you free
Until it sets you free.
 
You keep walking inland where no man is an island—
Come on home to me.
 
Just follow your desire,
Leave it all, you’re leaving all.
Just burn it in the fire
 
Of everything you once knew, and everyone that knew you,
Remove the shoes you came on, feel the earth you’re made from
Pack up all your questions, just keep heading inland,
And come on home to me.

Jars of Clay, “Inland”

This song is based on the story of Odysseus, who walked so far inland that the people didn’t know what a paddle was. So Odysseus was pretty out of his element.

That’s how I’ve been feeling lately.

Not everything is different, but enough is that it feels like I am in another world. I live in a different climate 1,000 miles away from my family, I have mountains blocking my view, I’ve applied to grad school, I’ve juggled three jobs, none in publishing though all about writing, I’m resigning from one of them, I’ve started writing not one but three books—and had I known exactly where all of this was going when I was eighteen and said that I wanted to be an editor, I would have been very doubtful that much of this was a good idea.

And yet, here I am. And while I feel like I have no idea where I’m going and only a vague idea of how I got here, I can look around with wonder and say that it is beautiful.

And since I’m in the midst of new things, I thought it was time that this website got an upgrade: I want to share more of my writing with you, so be on the lookout.  I’ve already posted A Love Poem About Home, which will give you a small taste of what I’ll be putting up.

You keep walking inland where no man is an island—
Come on home to me.

A Love Poem About Home

When I talk about “springing hills,” I was definitely thinking about Wales, and a house like this. Image via Flickr by MyfanwyX

The honeymoon stage doesn’t last forever in a relationship. It’s just the short, euphoric period of time in the beginning of a relationship. However, I wouldn’t call it the highlight, and I’m not sure that most people in long-term relationships would either. I think what you lose in butterflies and thrills you gain in depth and understanding.

Have you got a taste of what it is like to be known—and I mean all the skeletons, all the fears, all the places that still hurt?

This week I told someone how I met the Mister. Everyone’s relationship has a spark or fireworks at the beginning, but one thing I love about our story is that I think we got more fireworks than most.

We’ve got everything a good Hollywood romance needs: The romantic backdrop of lovely Oxford, England. The beauty of getting to know each other first and then falling in love.  The drama of unrequited love when one of us figured it out first. The painful waiting and jealously of a long-distance relationship. The turmoil and vulnerability of letting someone know you better than anyone else ever did.

Frankly, I think emotional turmoil is what makes a good story, but then again, I’m kind of a drama queen. Either way, the first year or two of our relationship had plenty of it. But it was never the bad kind of turmoil. It was surrounded by this kind of out-of-my-mind euphoria that comes from being head over heels in love.

We’ve been married a while now, and I feel like I’m finally in my right mind again, and life is different—a lot calmer, a lot more mundane. And things have been hard lately, too, but they’ve still been good because of who I married.

That’s basically what this poem is trying to say. Our love doesn’t feel like a wild and crazy adventure anymore. It feels like coming home.

We tumbled from the sky.
The earth was kind to us, welcoming our feet with springing hills
and warming our hands with light that struck our hearts and shot joy to
our fingertips.
 
I never thought loving you would be easy.
 
And yet falling was so simple, wrapped up in you,
with the wind throwing us down so that
I couldn’t even find gravity as we traveled
through fog and sunsets and clear blue skies to
land here.
 
Feet on the ground, loving you is second nature,
even without the wind to buoy us up and send us
looping in free form adventures.
 
I find that roots have their own breed of excitement
and that loving you through burned dinners and
unfamiliar neighborhoods and
cant-get-out-of-bed depression
hurts
and takes me to unfamiliar places and
makes unused muscles in my heart sore.
 
But I love the strange ground and I
don’t miss the sky and I
love that we still take off for adventures
in the air before coming home to
springing earth and
warming light and
home.

Vase Fillers: How to Decorate with a Terrarium without Plants

I love using a terrarium for everything but growing plants. I have limited luck with indoor plants, and creating a terrarium is too much work for the high risk of failure I’d expect. Besides, I like changing my mind too much to put something in my terrarium that I can’t easily remove later. Instead, I like to use fillers (as you’ve seen). As I explained in my winter décor post, I was having trouble coming up with a filler for winter décor. I turned to Google for inspiration…

If you google “terrarium décor” you get terrariums used as terrariums. Not helpful. But if you google “Vase filler” you get TONS of creative ideas. I don’t really want to have to dig through Google every time I want to decorate, so here are two great ideas for every season:

Winter Vase Fillers: Cranberries and Ornaments

For Christmas, try jingle bells, cranberries, fake snow, or silver-tipped pine cones. I particularly like the cranberries and the layering effect of using fake snow and then another vase filler.

I also have a soft spot in my heart for solid color ball ornaments. Antiqued mercury glass ones are the best, but packages like these  work just as well and are very cheap at Wal-Mart or Meijer. Not to mention you get your pick of color options!

Spring Vase Fillers: Moss and Birch Wood Rounds

For spring, use moss with a candle. Or basically anything with moss:

A woodland theme goes along with the idea of a budding spring season as well, so get inspired by these birch rounds from Pottery Barn:

Summer Fillers: Sea Shells, Dried Peas, and Dried Beans

Green is a great color for summer—like a bright lime green. Nothing too mossy or spring-like. Enter dried split peas and bay leaves. Perfect! If you are looking for a cheap white filler—you are still in luck. See how great northern beans would work, or you can even use white rice.

Of course, sea shells are a classic choice—my mom pulls out all her great Florida sea shells for summer, and they look great in a basket and vases in the living room:

Fall Vase Fillers: Wine Corks and Crimped Book Pages

What is more romantic than wine by the fire in the fall? Enter wine corks as a vase filler. Also, they’re free. So that’s nice, too.

Of course, crimped book pages are beautiful and simple as well. The vintage look goes well with wood and autumn tones but can easily transfer to almost every other season:

So those are a handful ideas for vase fillers and terrariums. What unique vase fillers do you use or love?

DIY: How to Make Silver Mercury Glass Pears

So here is my guide on how to make Mercury Glass Pears. The project cost about $20, but I had a lot of fun and know I will keep using these. I got my inspiration from an ornament tutorial from Polka Dot Made, but she used paper ornaments, gold, and gold flakes. I wanted to use fruit since I couldn’t find any paper ornaments small enough, I wanted silver, and silver leaf was cheaper than silver flakes. SIDE NOTE: You will have extra silver leaf to add to your craft box after this. Hurray!

Aren't they lovely? Can you see the hint of gold?

Aren’t they lovely? Can you see the hint of gold?

Materials from Hobby Lobby:

  • Fake pears (1 bag of small pears, 1 bag of large pears)- $8
  • Silver Acrylic Paint – $1
  • Gold Acrylic Paint – $1
  • Silver Leaf – $5
  • Modge Podge – $3

I used a coupon so I got 40% off the silver leaf and the pears. That helped!

Step 1: The Initial Silver Coat

All the materials, plus Step 1, Step 2, and Step 3 of the process

Put a coat of silver paint on the pears. It will form a translucent layer where the pear will still look green or yellow but with a slight sheen of silver. That’s fine.

Let the pears dry.

Step 2: The Modge Podge and Silver Leaf

Working in small areas, brush on a very small amount of Modge Podge and dab the silver leaf onto the pear. The Modge Podge should be such a light layer that is it immediately tacky and begins drying before you add the silver leaf. Dab on the silver leaf by pressing the sheet against the area of that has Modge Podge. Don’t try to cover every area—leave gaps and let the silver leaf crinkle and clump so that the final look is more dappled than unified. You can always go over an area again with more Modge Podge and silver leaf.

Let the pears dry—actually, the first ones will probably be dry by the time you finish the last ones, so you can go ahead and move to Step 3.

Step 3: The Second Silver Coat

IMG_0153

Brush another thin layer of silver paint over the silver leafed pears. Dab paint thicker over areas where the original green or yellow of the pear is poking through. Let Dry.

You can leave the pears here, and they will look great! However, I took them home and realized that they were too silver-y to match my Mercury glass. They needed the added warmth of gold. So in that case—

Step 4: The Final Gold Coat

Apply a very light, almost dry-brushed layer of gold paint all over the pears. This will add just the final touch of warmth needed. You can see how the silver and metallic look still comes through, but it is muted with the antiqued look of gold. Perfect!

It was kind of an involved process, but I love doing stuff like this and had a blast!

Of course, it is pretty easy to see that the process is flexible and that I was kind of learning as I went. You could begin with a gold layer instead of silver, or you could try skipping the initial silver layer altogether, etc. Try the look with a couple of experimental pears first to get an idea of what you want to do.

Here’s the final look with it all put together:

IMG_0156

After Christmas Winter Decorations

This is long overdue! Christmas is over, and I never had time to decorate for Christmas. It’s such a bummer because I love  Christmas decor. I am determined, though, to still decorate for winter. Not Christmas, which is pretty easy (red candles, greenery, and you’re set) but late winter to early spring. Something that will match January, Valentine’s day, and the rainy, just-starting-to-get-green March. Here’s what I ended up doing:

Lots of silver. oh, and a new picture frame. $3 from Walmart, and it looks pretty good!

Lots of silver. oh, and a new picture frame. $3 from Walmart, and it looks pretty good!

Luke got me some mercury glass candle holders I had been dying to have from TJ Maxx, so I used those as my starting point. From there, I added white candles which I had on hand. My idea was to use mainly silver and white with a touch of another color (perhaps green or blue). I could have used blue candles but didn’t for two reasons:

  1. I don’t have blue candles
  2. I don’t really like blue. I only like it as a very subtle accent color.

Since the candles were unusually tall, I put the terrarium on one of the large books on the other side of the painting so that the heights were staggered but closer together. Now all I needed was a filler for the terrarium….

I loved the silver, white, and cream ornament balls on the stoneware plate in this picture:

I also loved these paper stars covered in glitter:

These are some frosted pine cones that I considered as well. Perhaps glitter pine cones? Is that tacky or on-trend these days?

Unfortunately, I waited too long after Christmas to get a good deal on the white, cream, and silver ornaments—there were perfectly good and cheap ones at Meijer! So instead I ended up working on making silver mercury glass pears. I got the idea from Pottery Barn:

I debated on going with glitter or silver leaf—here’s a great tutorial for coating fake fruit in glitter. But while glitter might have been easier, I really, really wanted these to match my mercury glass. So I went with silver leaf. Tutorial on the pear making process coming soon! Spoiler alert: It took a couple of hours, but I loved every minute of the craftiness.

Oh-So-Easy Chicken Fried Chicken in 30 Minutes

I came up with this recipe on accident when making another recipe. The fried chicken tasted so good I made it its own meal. It tastes so amazing, and the chicken is so tender that you can cut it with the side of your fork. And I can make this a whole meal in a half hour.

The gravy recipe is a modified version of the gravy recipe from 1000 Gluten Free Recipes by Carol Fenster. If you end up using almond milk like I did, you may need to add more seasoning, so you can modify this recipe to taste. The almond milk adds a touch of sweetness to the gravy. Regular milk would work as well, though. You may want to double the gravy recipe if you love gravy or want to make enough to pour over mashed potatoes. This will make just enough to pour over both pieces of chicken.

Oh yeah, and this recipe is gluten, corn, soy, and dairy free. And Candida Diet kosher.

IMG_0069 IMG_0076

.

.

.

.

.

.

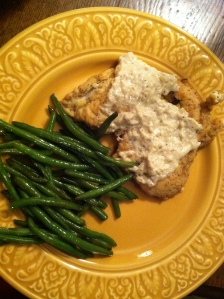
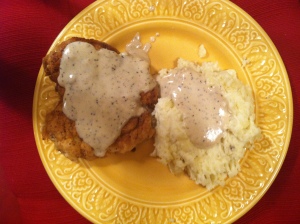
These pictures are from the last two times I made this. For the picture on the left, I let the gravy thicken too much. For the picture on the right, I am ashamed by the lack of vegetables. I apparently can’t master the art cooking two sides AND a main dish.

Ingredients:

For the Chicken:

2 tablespoons Olive Oil, or 1 tablespoon oil and 1 tablespoon butter

2 chicken breasts, fresh or thawed

1 egg

½ cup brown rice flour

½ teaspoon lemon pepper (or more, to taste)

½ teaspoon salt (or more, to taste)

½ teaspoon pepper (or more, to taste)

For the gravy:

1 tablespoon chicken drippings

1 cup of almond milk, divided into ¾ cup and ¼ cup ( I use the unsweetened coconut and almond milk blend)

2+ teaspoons brown rice flour

¼ teaspoon pepper

¼ teaspoon salt

Sprinkle of garlic powder

Directions:

If chicken is frozen, thaw it out thoroughly. It has to be thawed enough to pound out. Place one piece of chicken in a Ziploc bag and pound out until the meat is only ½ inch thick. Try not to break it into separate pieces. I don’t have a meat tenderizer, so I use the muddler from our bar set. It works perfectly!

Add the olive oil and butter to a large skillet and heat over medium high to high heat. If the oil starts to pop before you are ready, turn heat to low, but you need the oil to be very hot. Mix together the brown rice flour, lemon pepper, salt, and pepper in a pie plate. Beat the egg in a separate pie plate.

Dip the pounded-out chicken in the flour mix, than in   the egg, then back in the flour. Set aside. Repeat with other piece. You can continue re-dipping the chicken until all the egg or flour is used up.

By now the oil should be hot, so add the chicken to the skillet. Fry for 5 minutes, then turn over and fry for another 5 minutes. You may need to add more oil when turning if the skillet looks dry. The time may vary, depending on your stove and how hot the oil is, so watch the chicken and turn when each side is cooked to a nice dark brown. Mine works perfectly at 5 minutes a side though.

Remove chicken. Remove all but 1 tablespoon of drippings from the skillet. Add in ¾ cup of milk. Add and let it bubble on high while you mix the rest of the ingredients together – the 2 teaspoons flour, ¼ teaspoons salt and pepper, and garlic powder to remaining ¼ cup of milk. Mix until smooth, then pour into skillet. Cook gravy, stirring constantly, until thickened. If mixture is not thickening fast enough, add another teaspoon of flour. Taste the gravy to see if it needs more seasoning. Once thickened, turn off burner. Pour gravy over chicken and serve.

A Candida Diet Recipe Worthy of Thanksgiving

I love Thanksgiving. Mostly because I love pumpkin pie and savory foods like cranberry relish, although I’ve never much cared for turkey. One of the absolute BEST parts of Thanksgiving has always been my Granny’s cornbread dressing. It is so flavorful, so moist…ah. None of that dry crumbly stuff Northerners call stuffing. This is honest-to-goodness delicious dressing.

Unfortunately, I have not come here with a gluten-free and corn-free version of said recipe. I was really going to give it shot using the rice version of cornbread from the cookbook You Won’t Believe It’s Gluten Free. But with my taking to the candida diet, and my finding the new awesome recipe below, I decided adventures can wait another year. Perhaps I’ll post the recipe anyway because even with the corn bread it is an amazing gluten-free dish. I have to call and ask my mom first, though. After all, it’s her family recipe, not mine.

What I have come to share is Walnut Sage Smothered Quinoa Pilaf from Food52.com. It may not sound so terrific to you, but one whiff of it and one taste and you will throw out any stuffing you had planned on making and will turn to this recipe instead. SO amazing. It actually even has a bit of that stuffing texture from the processed walnuts. My family modified the recipe to be candida diet friendly, so I’ll repost the ingredients and directions here, crossing out what we didn’t use.

Walnut Sage Smothered Quinoa (Image via Food52.com)

To add a plug on just how great this recipe is, let me tell you that I have every intention of eating whatever I want for Thanksgiving dinner. Pie, sweet potatoes, cranberry relish, you name, it will be on my plate. I will probably even have a roll. HOWEVER this quinoa recipe is SO good, I have decided to make it instead of Granny’s dressing. So this is a taste choice, not a I-have-to-because-I’m-on-the-weirdest-diet-ever choice. Not that I like this more than Granny’s dressing. It’s just that I like it an awful lot, so why not make it instead?

Since we didn’t use lentils (who ever has lentils on hand, anyway?), we might’ve modified the liquid at the beginning. Just cook it how you know to: ½ cup quinoa to ¾ cup liquid. Boil the liquid, add the quinoa, simmer covered for about 15 minutes or until all liquid is absorbed.

Another word of the wise: hold off on adding all the lemon juice. Ours turned out a little too lemony, so next time we would slowly add to taste instead of dumping it all in.

P.S. I call it stuffing because it is dry like stuffing, if that’s what you like. Not in a bad way, it just is. So I can’t bring myself to call it dressing. That name belongs to my Granny’s recipe.

Finally. Here it is: Walnut and Sage Smothered Quinoa

  • 2 cups ¾ cups water
  • 1/2 cup organic white Quinoa
  • 1/2 cup Beluga lentils
  • 1 cup Walnuts, toasted
  • ~20-22 Sage leaves
  • 1/2 teaspoon Kosher Salt
  • 2 tablespoons unsalted butter
  • 1/2 cup Crumbled Feta Cheese
  • 1-1 1/2 tablespoon orange zest
  • 1-2 tablespoon Extra Virgin Olive Oil (EVOO)
  • Juice of 1/2 a lemon About 1 tablespoon of lemon juice (Don’t add all at once! Add a little at a time, to taste)
  • salt and pepper, to taste
  1. In a large saucepan, combine the water & salt & bring to a boil. Add the beluga lentils, cover & cook for 5 minutes. Add the Quinoa and lower the heat to medium. cover & allow to cook till all the water is absorbed (~ 15 minutes). once cooked, fluff the lentil quinoa mix with a fork.
  2. Combine 1/2 a cup of toasted walnuts and about 15 torn sage leaves & coarsely mince in a food processor till they resemble coarse bread crumbs (albeit with a tantalizing aroma)
  3. Add 1 tablespoon of butter in a small skillet and add the minced walnut/sage mixture. Saute till the bits of sage begin to wilt.
  4. In a large mixing bowl, combine the remaining walnuts (broken into small bits), Lemon juice & orange zest. Add the feta cheese, quinoa/lentil mix, the sauteed walnut/sage blend and fold to combine all the ingredients. Drizzle with the EVOO, taste and adjust for seasonings as per your preference.
  5. Heat the remaining butter and add the remaining sage to it, sautee till the leaves crisp up and add the mix to the lentil quinoa pilaf as a garnish.

Homemade Green Salsa, From-Scratch Taco Seasoning, and Mexican Stuffed Peppers

This is a 3-in-1 recipe blog centering on the delights of spicy Mexican food. All recipes are easy to remember and fairly easy to prepare – only a lot of dicing with the salsa, but that isn’t a problem if you’ve got a Pampered Chef chopper (or the knock-off Bed Bath & Beyond version) like I have. And all recipes are Candida Diet friendly, as long as you can handle spicy foods (which I hear is off limits to some people). So here goes:

Taco Seasoning:

One batch of taco seasoning

This recipe is from Allrecipes.com. I use it exactly as written, but I’ve copied it here to make it easier. One recipe equals 3 Tablespoons. I make a double batch or bigger and store it in an extra container so I don’t have to mix it up very often.

Mix Together:

  • 1 tablespoon chili powder
  • 1 1/2 teaspoons ground cumin
  • 1 teaspoon sea salt (I use a little less – perhaps ½ teaspoon)
  • 1 teaspoon black pepper
  • 1/2 teaspoon paprika
  • 1/4 teaspoon garlic powder
  • 1/4 teaspoon onion powder
  • 1/4 teaspoon crushed red pepper flakes
  • 1/4 teaspoon dried oregano

Add to 1 lb cooked ground beef with a little water over medium heat until evenly coated and water has absorbed.

Green Salsa:

I found a tomato-free salsa recipe on the website Gluten Free / Dairy Free NJ. I modified it significantly so I am putting my version here.

Finely chop:

2 green peppers, 3 jalapenos, 1/2 bunch cilantro, 1 onion, 1 tbsp lime juice

  • 2 green peppers
  • 3 jalapeno peppers
  • 1 small onion
  • Half of one bunch of Cilantro

Mix all this together and add:

  • 1 Tablespoon lime juice

You can make this spicier by choosing very wrinkled jalapenos or by adding jalapeno seeds. And it is absolutely delicious! I brought it to a party so that I could have some salsa, and everybody ate it before I even got seconds. Seriously. Go make this. The nice thing with the recipe below is that it only calls for half a batch of salsa, meaning you have about two cups of salsa leftover to eat with chips, serve with burritos or otherwise use and enjoy. It lasts a long time in the fridge, too.

And now for the grand prize recipe….

Mexican Stuffed Peppers

This is a very easy recipe to modify for your tastes. Want it less spicy? Add less taco seasoning. Need it to stretch? Cook an extra half cup of rice.

By cooking 1 cup rice AND 1/2 cup quinoa and using all the salsa, I made two pans of pepper–one for me, and one for Luke (because I like quinoa more)

Ingredients:

-1 cup uncooked rice or ½ cup quinoa
-1 lb ground beef
-1 batch (3 Tablespoons) taco seasoning
-½ batch (about 2 cups) green salsa
-3-4 green peppers
-1 Tablespoon butter
-Shredded cheese (optional)
-Sour cream or plain yogurt (optional)
-Guacamole (optional)

Cook the rice or quinoa as directed. I use brown rice. You can make more or less stuffed peppers by adjusting how much rice or quinoa you use. Cook the ground beef and add the taco seasoning. Make the green salsa. Meanwhile, preheat the oven to 350 degrees. Put a skillet over medium-high heat, add the butter. Slice the peppers in half top to bottom, cleaning out the seeds. Rub the cut sides in the butter in the pan and let sear, about 3 minutes. Once brown to black, flip over and sear the opposite side. You may need to do two batches of this to sear all the peppers

Mix the ground beef, rice, and salsa together. Fill peppers with mixture, and top with cheese. If you have extra mixture, just place it around the peppers. Bake at 350 degrees for 15 minutes, or until cheese melts. Serve alone, or with sour cream and guacamole. Makes 6-8 peppers, or feeds 3-4 people.

You can see how easy it is to double this recipe. Use 1 lb of meat and a whole batch of the seasoning and salsa, and you have 12 stuffed peppers, perhaps more. Once you make this recipe, you can modify it to your taste, adding more meat, rice or seasoning.